Self-Hosting Without the Terminal: A No-Command Walkthrough
If the thing standing between you and running your own photo library or movie server is that blinking black window full of text, this guide is for you. Here's the honest deal: you will type exactly one line, one time, into a window your machine already gives you — and we'll read that line with you so it isn't a leap of faith. After it finishes, you never open that window again for normal use. Everything else — installing apps, launching them, changing settings — happens by clicking in a browser, the same way you'd use any website. No memorizing commands, no editing files, no "now SSH in and run this."
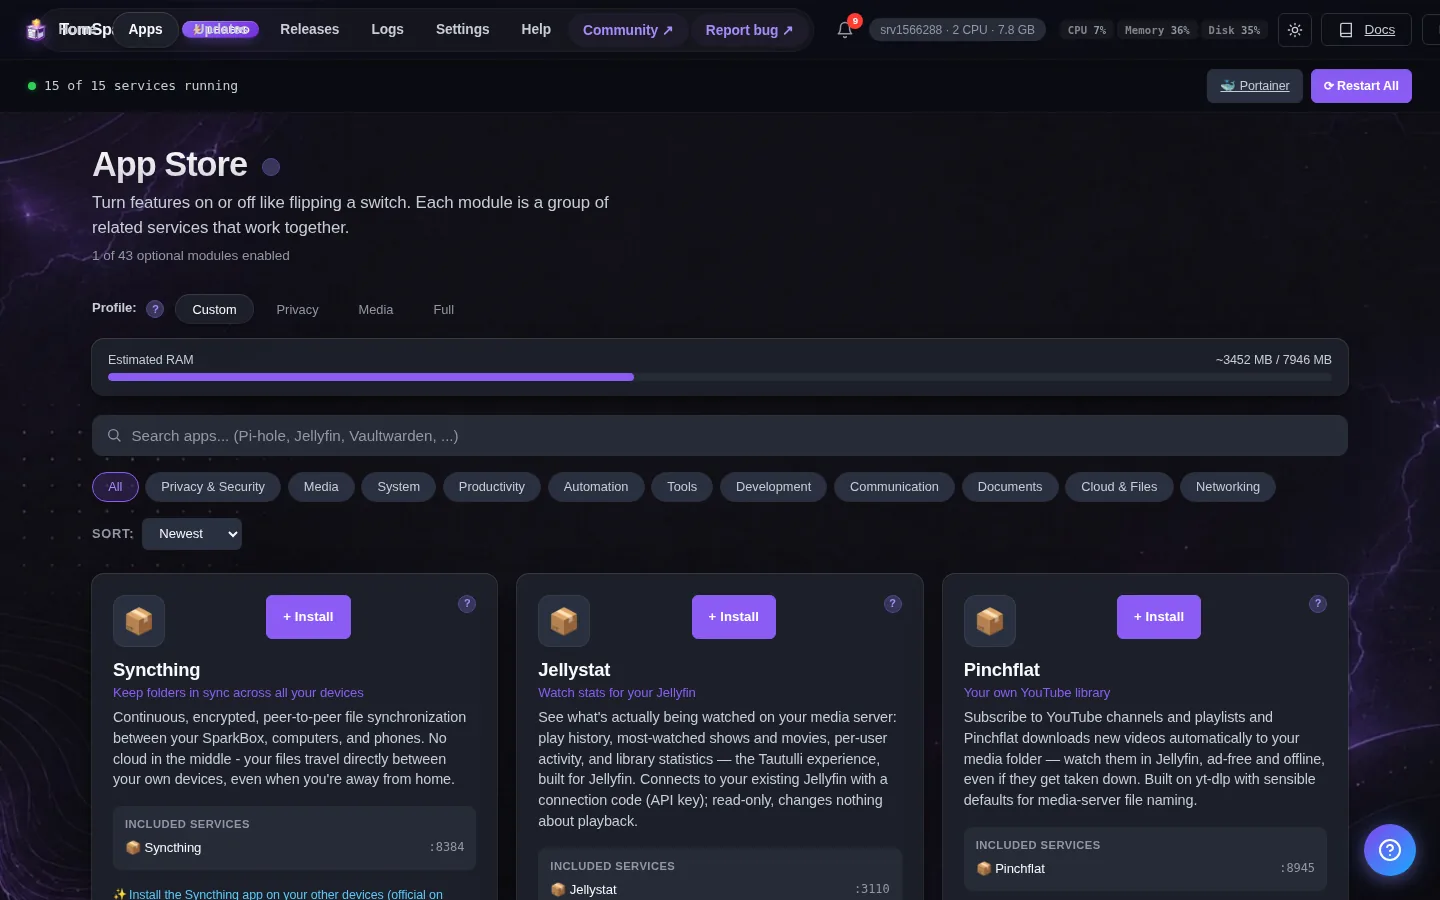
Tested on: a UGREEN DXP4800 Plus running SparkBox v1.6.163, with the same flow verified on a $7/month Hostinger VPS. No prior terminal, Linux, or Docker experience assumed.
- The window isn't the product — it's the doorbell
- The one command, read word by word
- Where you actually type it (the only terminal moment)
- What happens after you press Enter
- From here on it's a browser: installing your first app
- "Is it safe to paste a command I didn't write?"
- The honest part: the rare times a command comes back
- Where to start
1. The window isn't the product — it's the doorbell
A lot of self-hosting guides open the terminal on the first screen and never really close it, and that gives the wrong impression: that running your own apps means living in a command line. It doesn't. Think of that one command the way you'd think of pressing a doorbell — you do it once to be let in, and then you're inside a normal house with normal light switches.
The command's whole job is to install the thing that replaces the command line: a dashboard you open in your browser. Once that dashboard exists, it's the front door for everything. Installing an ad blocker, backing up your phone's photos, spinning up a movie server — all of it becomes "find the tile, click Install." So the terminal isn't where you'll spend your time. It's the doorbell you ring once.
2. The one command, read word by word
Here is the entire command. This is the only one in this guide:
curl https://get.tomsparkbox.com/install.sh | sudo bashIt looks cryptic, so let's take it apart left to right — because you shouldn't paste anything you can't read:
curl— a built-in "download this" tool. It fetches a file from a web address, exactly like your browser does when you click a link.https://get.tomsparkbox.com/install.sh— the address of the file it downloads: our install script. Thehttpsmeans it arrives over an encrypted connection, same padlock as your bank's website. You can open that address in a browser first and read the whole script yourself if you want to.|— this single character (called a "pipe") just means "take what was downloaded and hand it to the next thing."sudo bash—bashruns the downloaded script;sudogives it permission to install software, the way Windows or macOS pops up "this app wants to make changes." You'll be asked for your machine's password once.
Put together, in plain English: "Download the SparkBox install script and run it with permission to install software." That's the whole thing. It is not magic and it is not a trick — it's the standard, well-worn way Linux software gets installed, written out in one line.
3. Where you actually type it (the only terminal moment)
You don't need to install a terminal or learn how one works. Your machine already has a window where this line goes, and getting to it is a couple of clicks:
- On a UGREEN NAS: open the web interface, go to the App Center, install (or open) Terminal, and click to open it. A black window appears with a blinking cursor. That's the spot.
- On a Synology NAS: Control Panel → Terminal & SNMP → tick Enable SSH, or use the built-in terminal if your model has one.
- On a rented VPS (like a $7/month Hostinger box): every host gives you a "Console" or "Terminal" button right in their control panel. Click it and the same kind of window opens in your browser.
- On an old laptop: if it's running Ubuntu or similar, press the Super key, type "Terminal," and open it.
Now the part that trips people up the first time: pasting. In most of these windows, regular Ctrl+V doesn't work — use Ctrl+Shift+V, or right-click → Paste. Paste the one line from section 2, then press Enter. If it asks for your password, type it (the screen won't show dots or stars as you type — that's normal, it's still registering) and press Enter again. That's the last thing you'll type here.
4. What happens after you press Enter
Text starts scrolling. You don't need to read or do anything with it — it's the script narrating itself. In order, it:
- Installs Docker for you if your machine doesn't already have it (Docker is just the engine the apps run on — you never touch it directly).
- Downloads the ready-made settings for about 35 self-hosted apps.
- Starts the dashboard and prints a link to it, something like
http://192.168.1.10:8443— your box's address followed by:8443.
This takes roughly 5–10 minutes, mostly waiting on downloads. When it's done, it stops scrolling and shows you that dashboard link. Copy that link, open it in your browser, and you can close the terminal window for good. You've rung the doorbell. From here on, this guide doesn't ask you to type another command.
5. From here on it's a browser: installing your first app
Open the dashboard link. You'll see a grid of tiles, one per app. To prove the point, let's install Pi-hole — a network-wide ad blocker — start to finish. This is the entire process, and it's representative of every app:
- Find the Pi-hole tile and click Install.
- Wait about 30 seconds while the tile shows it's working.
- Click Launch. A small popup appears with the app's address and a password that was generated for you — you don't invent one.
- Click the address, paste the password, and you're in.
That's it. No port to pick, no folder to set up, no config file to edit, no password to think up. Behind that one Install click, SparkBox wrote the technical setup file, chose safe settings, and started the app — you simply didn't have to see any of it. The same four-step rhythm installs a private photo library to replace Google Photos, your own Netflix-style movie server, a password manager, a personal cloud drive, and around thirty more. Each app also gets its own hand-written setup guide here on the site that walks the final touches with screenshots — so you're never left guessing.
If you'd like to see the dashboard side in more depth before you start clicking, the dashboard-for-beginners guide is the natural next read, and can you self-host without learning Docker? explains what's happening under the hood (short version: yes, and you don't have to care).
6. "Is it safe to paste a command I didn't write?"
This is a healthy instinct, and we'd rather you keep it than switch it off. So here's the straight answer instead of "trust us":
- You can read the whole script first. Open
https://get.tomsparkbox.com/install.shin your browser like any web page. It's plain text. Even if you don't understand every line, you can see there's nothing hidden — and you can paste it to any tech-savvy friend (or an AI assistant) and ask "is this doing anything sketchy?" - It runs on your machine, for you. The script doesn't create accounts on someone else's servers or send your files anywhere. It sets things up locally. SparkBox is free and open — there's no upsell baked into the install, and any usage statistics are strictly opt-in (off unless you turn them on).
- The address is the real one. The only safety rule that matters: make sure you're pasting the exact address above (
get.tomsparkbox.com) and that it'shttps. Don't run install commands you found in a random comment or a sketchy forum — that advice is true for any software, not just this.
That's the trade: one command you can fully inspect, run once, in exchange for never needing the command line again.
7. The honest part: the rare times a command comes back
We're not going to pretend the terminal vanishes forever. For everyday use — installing, launching, updating, changing settings — it genuinely doesn't come back. But there are a couple of uncommon moments where one line resurfaces, and you deserve to know them now rather than feel ambushed:
- An app misbehaves in a way the dashboard can't explain. Once in a while something needs a peek at that app's logs. In practice the path is: post in d/sparkbox with a screenshot, and we'll usually reply with one exact line to paste — not a lecture, just a copy-paste fix.
- Locking down a brand-new UGREEN NAS. A fresh UGREEN ships with its stock system phoning home. Our privacy guide has a few one-time commands for that, but it's separate from running your apps and it's a one-and-done.
Notice what's not on that list: nothing about daily use. "Occasionally paste one line we hand you" is a very different life from "learn to live in a terminal."
8. Where to start
The whole journey, start to finish:
- Pick a machine: an existing NAS, a $7/month VPS, or an old laptop with 8 GB of RAM.
- Open its built-in terminal window (for example, UGREEN App Center → Terminal, or your VPS panel's Console button).
- Paste the single command from section 2, press Enter, and let it finish.
- Open the dashboard link it prints — then close the terminal.
- Click Install on one app you actually want, and follow its setup guide.
You'll have a real, private app running on hardware you control, and the only command you ever typed was the doorbell. If you don't own a machine to run it on yet, the absolute-beginner guide covers the cheapest ways to get one.
Next steps
One command, then it's all clicks.
SparkBox installs a browser dashboard that runs 35+ self-hosted apps as one-click tiles — it writes every config file, picks every port, and generates every password for you. Free and open. The only line you type is the one that installs it.